
Bulk upload Assets
Validate a current Asset template, resolve row issues, normalize accepted records, and verify the result.
Outcome: Create multiple Assets from a validated CSV or XLSX file, retain a result report, and find the new records.
For: Customer administrators and engineers
Permission: create assets
Time: 10–30 minutes, plus background processing
Changes made: Creates shared Asset records; successful rows can be created even when other rows fail
If you're stuck
- Start again from + Add Asset → Add Bulk Asset and download a fresh template for the intended Asset Type.
- Keep the template headers unchanged, with one Asset per row and no merged cells.
- Resolve every item labeled Missing or Unknown before Upload & Validate.
- After validation, inspect Invalid, Failed, and Needs Review before selecting Confirm & Normalize.
- If submission is uncertain, search Inventory and Discovery before retrying; retrying immediately can create duplicates.
Before you start
- Search for the intended Assets first, using a unique name or external identifier.
- Split files by Asset Type. The selected type controls the template and validation rules.
- Download the current template during this upload; a saved older copy can be stale after schema changes.
- Decide whether the new Assets should be reviewed in Discovery or maintained in Inventory.
- Preserve the completed source file and final report until record counts are reconciled.
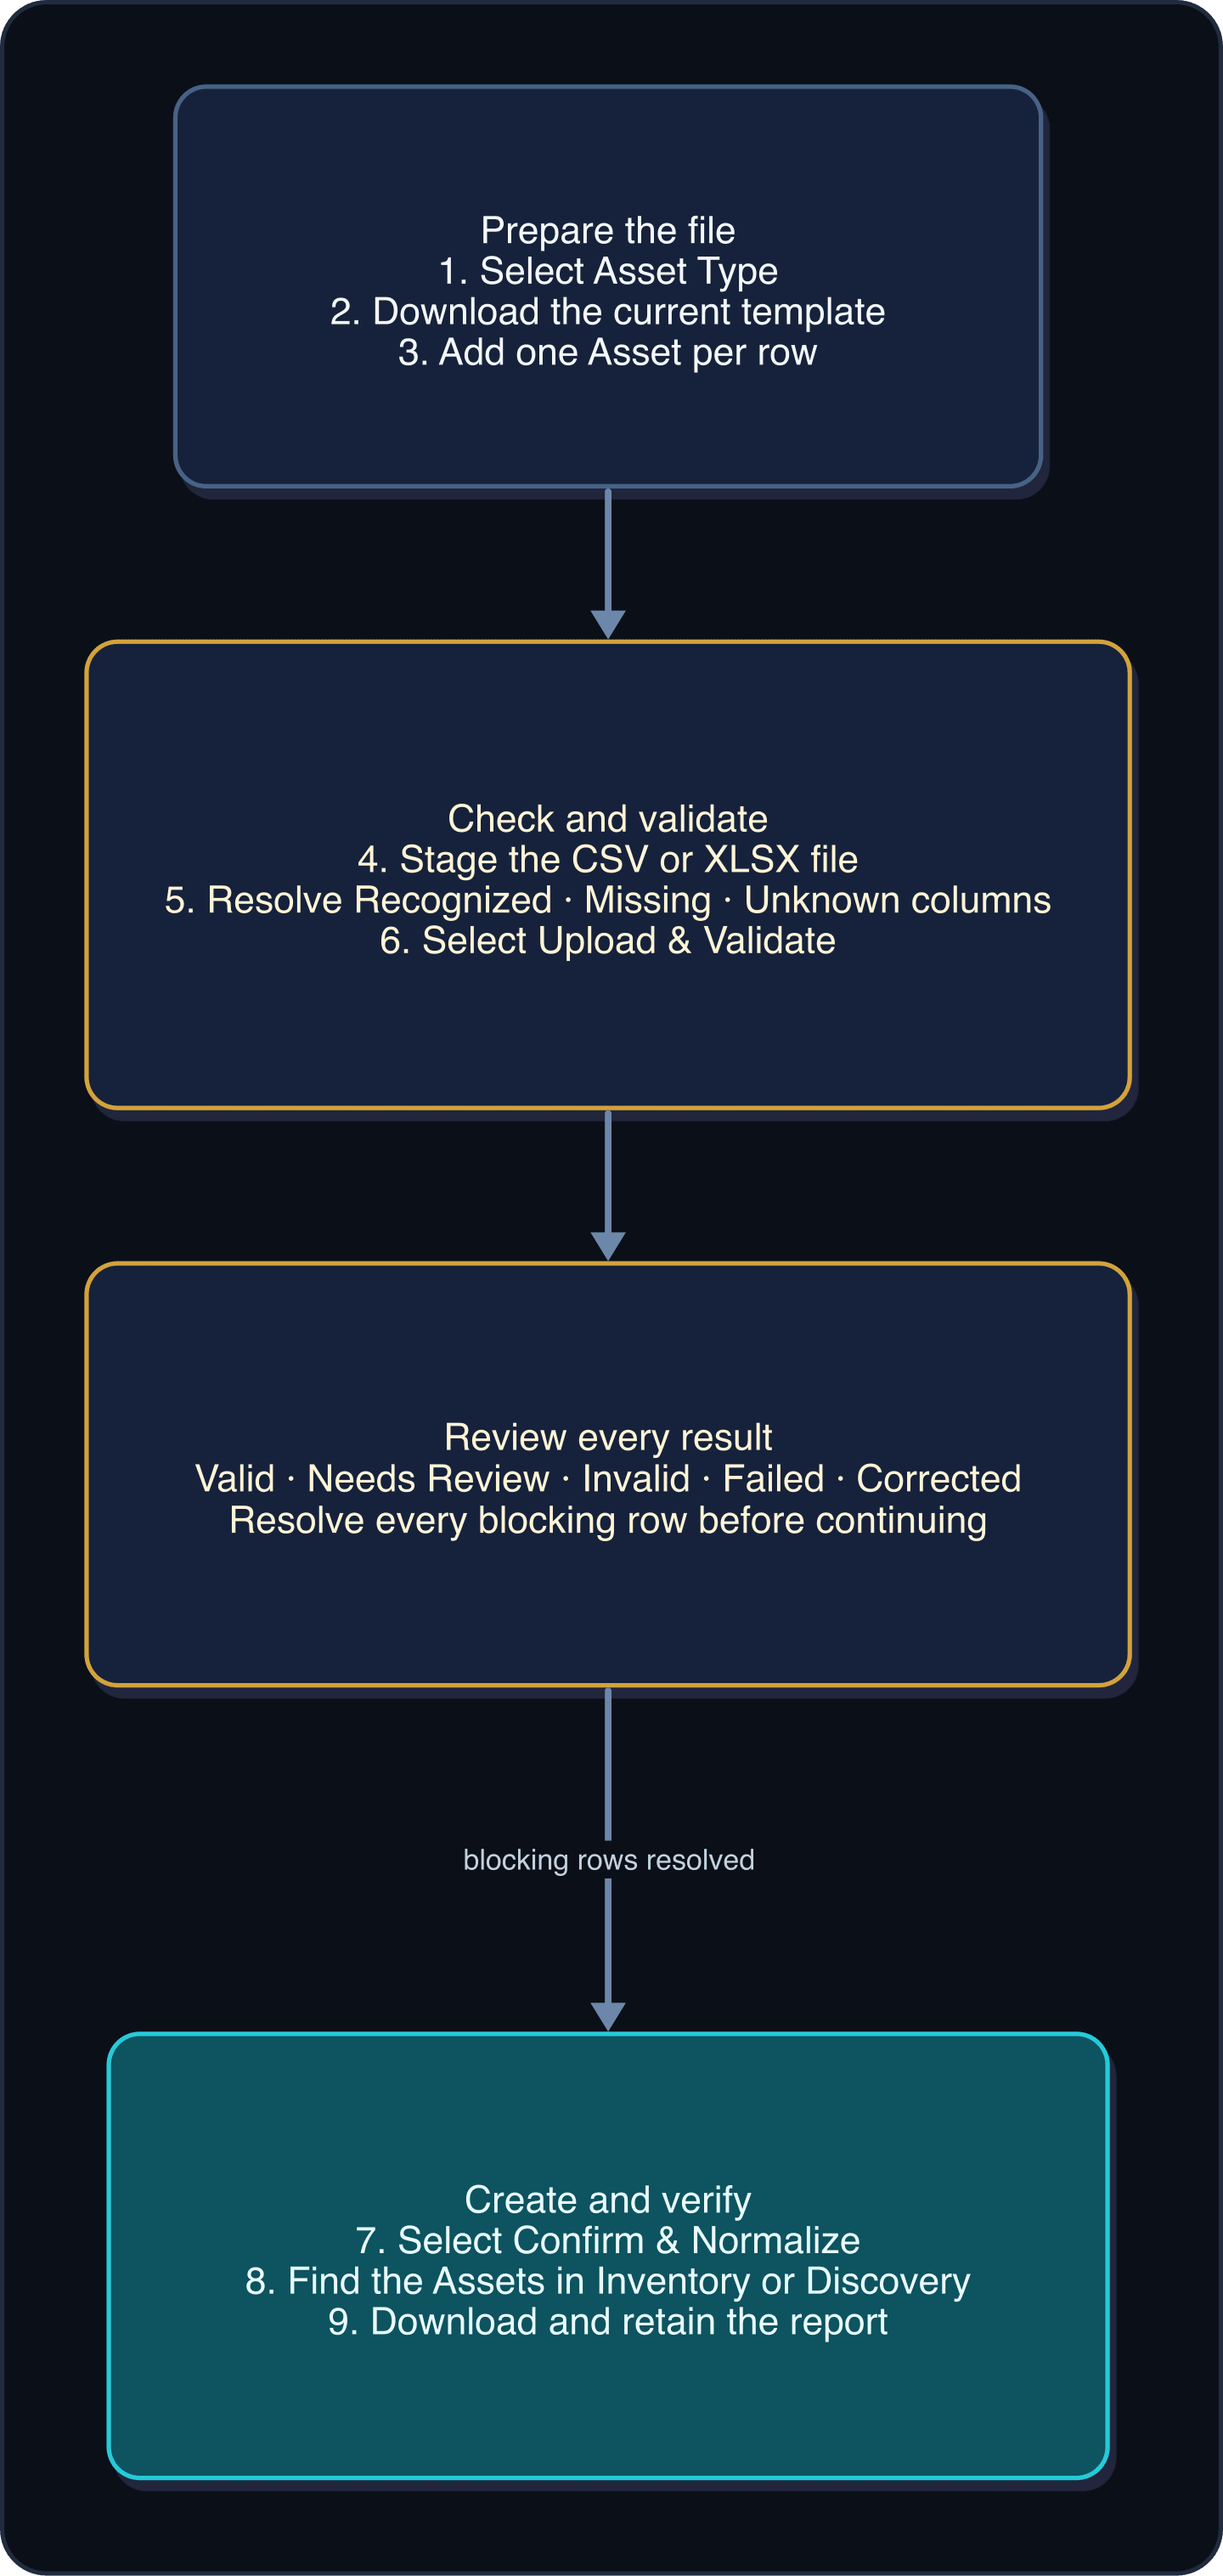
The file is checked twice: first for recognizable columns, then row by row. Confirm & Normalize is the consequential step that creates accepted Assets.
Field and option guide
Information you need
| UI label | What to enter or choose | Where the value comes from |
|---|---|---|
| Asset Type | Required. Select the type that defines the template and row schema. All, Custom, and Global only filter the picker. | Existing Asset Types. |
| Download template | Download a new copy after selecting the Asset Type. Use that copy for this upload. | WanAware bulk uploader. |
| Status column | Use a value allowed by the template to place each row in Discovery or Inventory. | Your team's review process. |
| Asset name column | Enter one non-empty, durable identity per row and check for duplicates before uploading. | Approved source data. |
File and row results
| Result | What it means | What to do next |
|---|---|---|
| Recognized | The column matches the selected template. | Confirm every intended column appears here. |
| Missing | A required template column is absent. | Add the named column before continuing. |
| Unknown | A header does not belong to the selected template. | Rename or remove it; do not map it by guesswork. |
| Valid | The row has no blocking issue. | Continue to normalization after reviewing the values. |
| Needs Review | WanAware suggests a correction or needs confirmation. | Accept the suggestion or enter the correct value. |
| Invalid | A field or dependency rule failed. | Correct the field named in the row result. |
| Failed | The row could not be processed. | Save the error and retry only the failed row after correction. |
| Corrected | A reviewed row now passes. | Recheck the changed values before normalization. |
After creation, the selected Asset Type appears in the Asset's Type column and details. The Status value determines whether the Asset appears in Discovery or Inventory.
Prepare and check the file
- Open Functions → Assets → Inventory or Discovery.
- Select + Add Asset → Add Bulk Asset.
- In Add Asset in Bulk, choose the Asset Type. Use Custom or Global to narrow the picker when helpful.
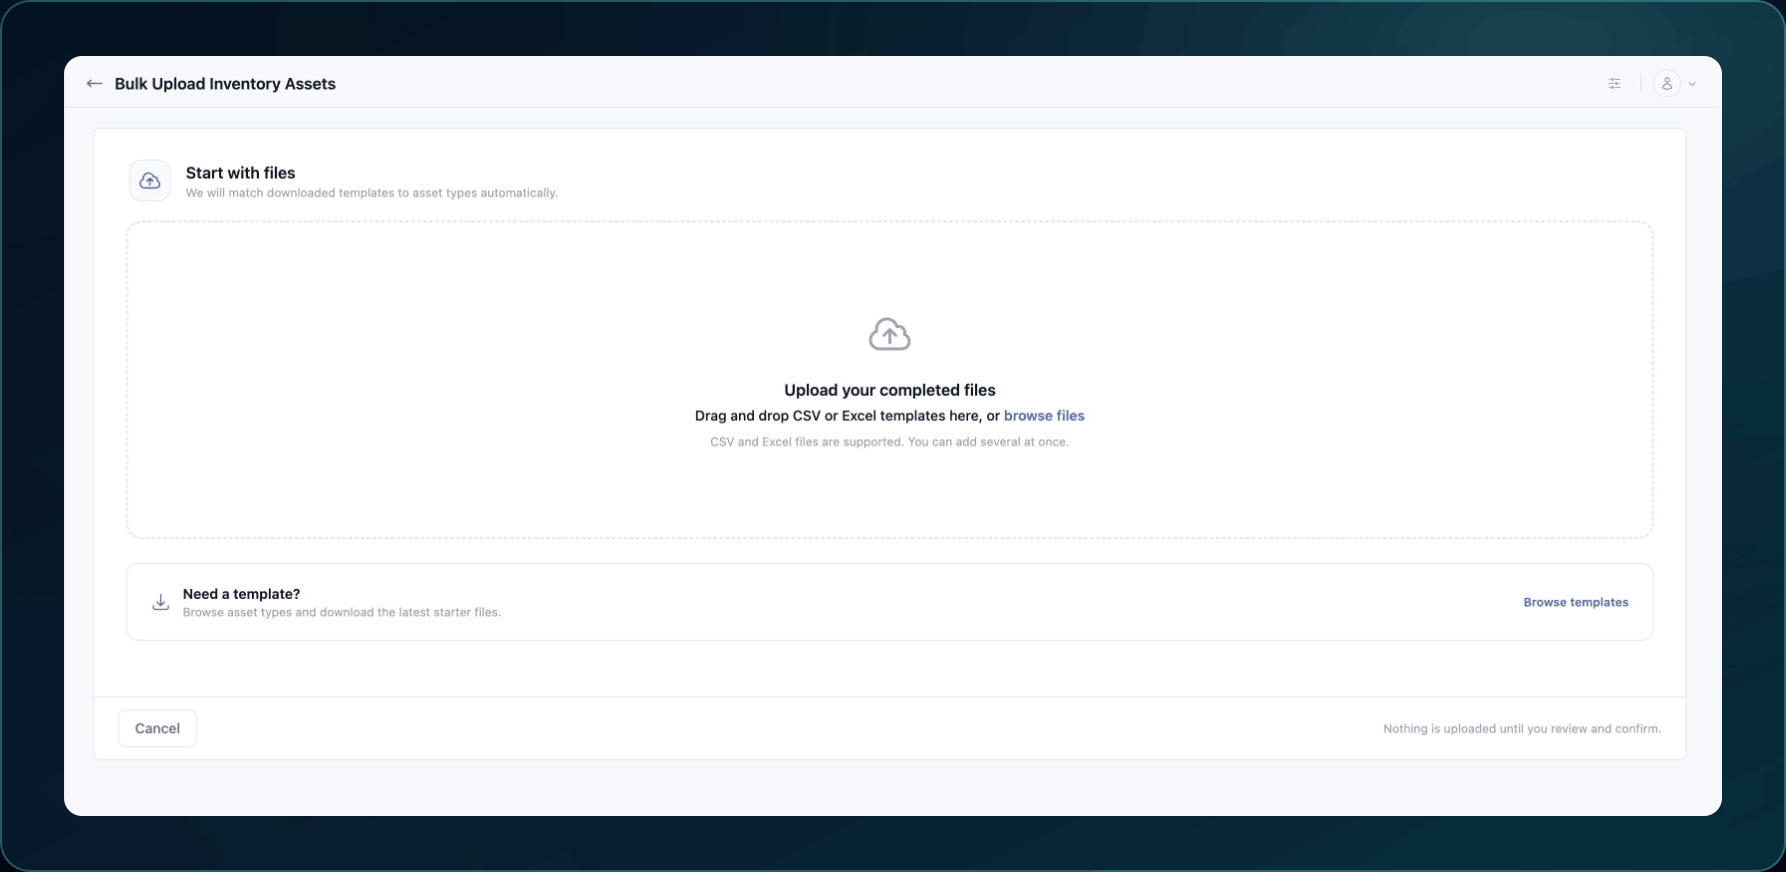
Use Select files to stage a completed CSV or XLSX file. Use Browse templates when you need a current template instead; a template is not an upload result and does not create Assets by itself.
- Download the current template.
- Add one Asset per row. Keep headers unchanged and preserve any provided choice or format guidance.
- Save as CSV or XLSX and close the spreadsheet before uploading it.
- Add or select the file in the uploader. If the Asset Type cannot be identified, use Assign asset type for that file.
- Review the file check:
- Ready to upload means required columns were recognized.
- Fix required means at least one missing or unknown column blocks the next step.
- Preview skipped means the uploader could not present a reliable preview; confirm the file and assignment before continuing.
Expected result: Each staged file has an Asset Type assignment and no unresolved missing or unknown required columns.
If the template is stale, replace it with a fresh download and copy values—not old headers—into the new file.
Validate and correct rows
- Select Upload & Validate.
- Wait for validation to finish. Do not close the page while files are still uploading.
- Compare the total row count with the source file.
- Open Needs Review and inspect each suggestion before accepting it.
- Open Invalid and correct the named field or dependency.
- Open Failed, record each row and exact error, and decide whether those rows need a corrected retry file.
- Recheck Corrected to ensure edits did not alter the wrong field.
Expected result: Every row intended for this run is Valid or Corrected, and the accepted count matches your expectation.
Create and reconcile the Assets
- Select Confirm & Normalize only after the counts make sense.
- Leave the page open while the current job reports progress. Creation can continue as background processing.
- On completion, select Download Report and retain it with the submitted source file.
- If more files are needed, use Start New Upload. Otherwise select Close.
Expected result: The completion summary identifies successful and failed rows. A mixed result is partial success, not an instruction to resubmit the entire file.
If the browser closes or the outcome is uncertain, search for several unique names and compare them with the report before submitting any retry.
Verify
- Open Inventory and Discovery, starting with the status used by the file.
- Clear old search text and filters.
- Search for a unique first, middle, and last record from the file.
- Open each sample and confirm Asset Type, name, status, required fields, and catalog-backed choices.
- Reconcile source rows against successful, invalid, failed, and visible records.
Recover or retry
- For a partial success, create a new file containing only rows that were not created.
- For an invalid row, correct the named field using a fresh template if the schema changed.
- For a failed row, preserve its error and row number for Support.
- To stop before Confirm & Normalize, close the uploader; no normalized Assets should be created. After confirmation, treat created records as real shared data and use Delete Assets safely only after checking dependencies.
Learn and continue
- Learn: Add or import Assets
- In WanAware: Open
/assets/inventoryand select + Add Asset → Add Bulk Asset. Contextual help may also open from/assets/inventory/bulk/uploador/assets/discovery/bulk/upload.
Next steps
Get help
Email [email protected] with your company, affected user, selected Asset Type, page URL, upload timestamp and time zone, source row number, result state, expected versus actual counts, and exact validation text. Attach a sanitized sample and report only when approved. Never send passwords, credentials, access tokens, or secret values.
Updated about 2 months ago